Fixing a leaky dishwasher can be a hassle, but our step-by-step repair guide has you covered. Learn how to troubleshoot and repair common issues, and discover the essential tools and parts you’ll need. Get your dishwasher back in working order in no time!
In this guide, we’ll provide step-by-step instructions on how to fix a leaky dishwasher so you can get back to enjoying clean dishes in no time! We’ll discuss common causes of dishwasher leaks, how to troubleshoot the issue, and which parts you may need for repairs. So if your dishwasher is leaking, let’s get started!
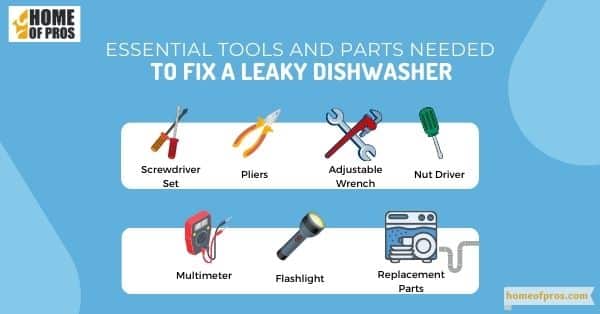
Essential Tools and Parts Needed to Fix a Leaky Dishwasher
When it comes to fixing a leaky dishwasher, having the right tools and parts is essential. Fortunately, most dishwasher leaks are caused by common problems that can be easily repaired with a few basic tools and parts.
Screwdriver Set
A set of screwdrivers with different types and sizes of heads, such as Phillips and flathead, will be necessary for removing screws and accessing various components of the dishwasher.
Pliers
Pliers are versatile tools that can help you grip and manipulate different parts of the dishwasher. They are especially useful for loosening and tightening hose clamps and connectors.
Adjustable Wrench
An adjustable wrench is indispensable for tightening or loosening nuts, bolts, and fittings. It will come in handy when working with water supply lines and other connections.
Nut Driver
A nut driver is a tool designed specifically for tightening or loosening nuts, bolts, and screws. It provides a secure grip and allows for easy maneuverability in tight spaces.
Multimeter
A multimeter is an electrical testing device used to measure voltage, resistance, and continuity. It is invaluable for troubleshooting electrical issues and ensuring proper connections.
Flashlight
A good quality flashlight will help you illuminate dark areas inside the dishwasher, making it easier to identify leaks, inspect components, and work in tight spaces.
Replacement Parts:
- Door Seal: The door seal, or gasket, is a common cause of dishwasher leaks. Have a replacement door seal that matches the make and model of your dishwasher.
- Tub Gasket: The tub gasket prevents water from leaking out of the dishwasher. Make sure you have a replacement tub gasket that fits your specific dishwasher model.
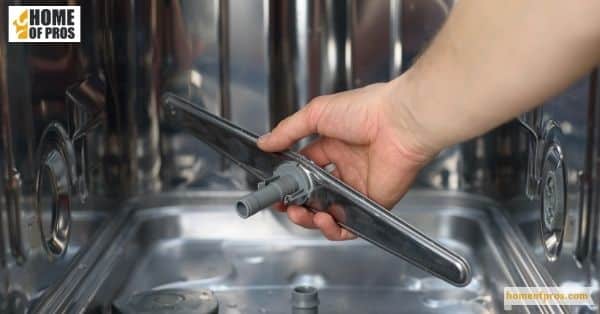
- Spray Arm: If the spray arm is damaged or not functioning correctly, it may cause leaks. Consider having a replacement spray arm available.
- Float Assembly: The float assembly helps regulate the water level in the dishwasher. If it’s malfunctioning, it can lead to leaks. Have a replacement float assembly ready if needed.
- Drain Hose: A damaged or clogged drain hose can cause leaks. Keep a spare drain hose that matches the size and type required by your dishwasher model.
- Drain Valve: If the drain valve is faulty or obstructed, it can contribute to leaks. Depending on your dishwasher, you may need a replacement drain valve.
It’s important to note that the specific tools and parts required may vary depending on the make and model of your dishwasher. Consult the manufacturer’s manual or online resources for your particular dishwasher model to ensure you have the correct tools and parts.
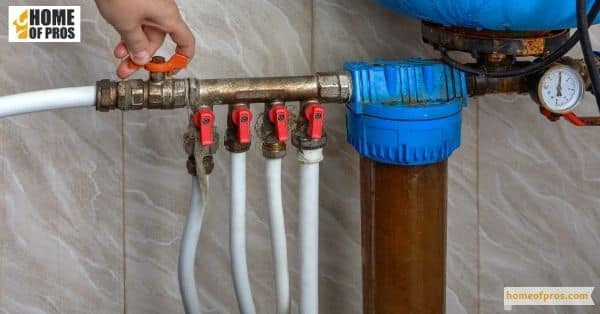
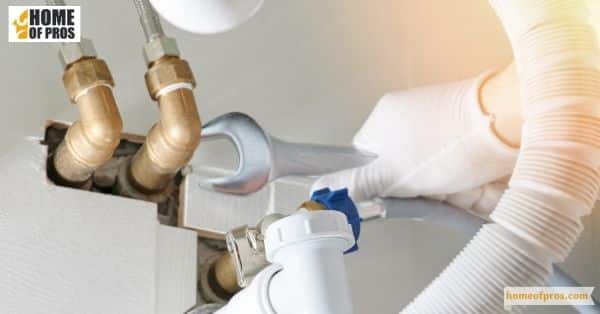
Step 1: Shut off the Water Valve
One of the first steps is to shut off the water valve to the machine. This will prevent any further water from flowing into the dishwasher and exacerbate the leak. It’s important to note that not all dishwasher water valves are located in the same place.
So be sure to consult your owner’s manual or do some research before beginning the repair process. Once the valve is turned off, you can move on to identifying and repairing the source of the leak. With some basic knowledge and a little elbow grease, your dishwasher can be back in working order in no time.
Step 2: Disconnect the Drain Hose from the Sink Drainage System
When tackling a leaky dishwasher, one of the crucial steps is to disconnect the drain hose from the sink drainage system. This may seem like a small task, but it’s an essential one that can prevent further damage and help identify the source of the leak.
First, locate the drain hose and determine whether it’s clamped or screwed into the sink. You may need pliers or a screwdriver to disconnect it.
Be sure to have a bucket ready to catch any water that may spill out. Once the drain hose is disconnected, inspect it for any blockages or damage, as this could be the root of the issue.
Taking the time to disconnect the drain hose properly can lead to a successful repair of your leaky dishwasher.
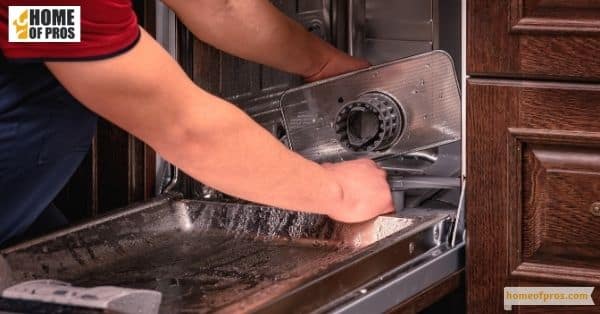
Step 3: Remove the Lower Panel of the Dishwasher
To begin, make sure the dishwasher is completely disconnected from its power source. Depending on the make and model of your appliance, you may need to remove screws or a kickplate to access the lower panel.
Once you’ve gained access, inspect the panel for any signs of damage or wear and tear. If the panel is in good condition, carefully detach it from the dishwasher and set it aside. From there, you can determine the cause of the leak and proceed with the necessary repairs.
While it may seem daunting, removing the lower panel of a dishwasher is a manageable task that can help extend the life of your appliance and prevent further water damage.
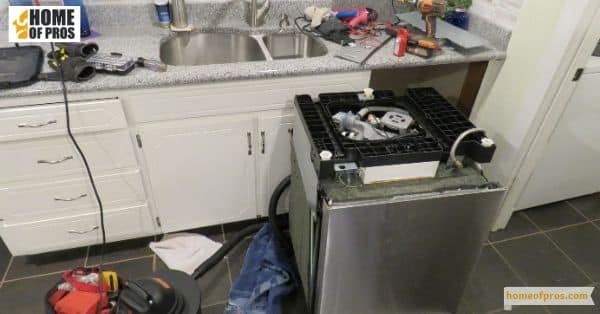
Step 4: Locate the Leak and Determine Its Cause
A leaky dishwasher can be quite a nuisance. Not only can it cause damage to your floors and cabinets, but it can also lead to higher water bills. The first step in fixing a leaky dishwasher is to locate the source of the leak and determine its cause.
This can be a bit tricky, as leaks can come from a variety of sources, such as the door seal, the pump, or the hoses. Once you have identified the source of the leak, you can then take steps to fix it. This may involve replacing a faulty part or tightening a loose connection.
With a bit of patience and know-how, you can get your dishwasher back in working order in no time.
Step 5: Repair or Replace the Faulty Component/s
It’s important to consider whether it’s worth repairing or if it’s time to replace the dishwasher entirely. If you choose to repair the unit, start by identifying the source of the leak, such as a damaged door seal or a clogged drainage hose.
From there, purchase the necessary replacement parts and follow a step-by-step guide to perform the repair. By taking these necessary steps, you can save money and extend the life of your dishwasher.
However, if the dishwasher is older and the repairs are extensive, it may be more cost-effective to invest in a new unit and avoid ongoing repairs.
Step 6: Reassemble and Test the Dishwasher
Reassembling the dishwasher involves putting all the removed parts back in their proper places, tightening any loose screws or bolts, and ensuring that everything is secure. After reassembling, it’s time to test the dishwasher’s functionality.
Turn on the power and water supply and run a cycle to ensure that there are no leaks. If there are still leaks, double-check that all the parts are correctly installed and tightened.
Checking for leaks not only saves money on the water bill but also prevents damage to your kitchen flooring and cabinets. By following these steps, you can enjoy a leak-free and fully operational dishwasher.

In conclusion
Fixing a leaky dishwasher is a task that can be easily accomplished by following a step-by-step repair guide. Leaks can be caused by a variety of issues, such as a faulty door gasket or a damaged spray arm.
The key to successfully repairing a leaky dishwasher is to identify the root cause of the problem, and then perform the necessary repairs. By following a detailed repair guide, you can carry out the necessary repairs in a safe and effective manner.
With regular maintenance and quick repairs, you can extend the lifespan of your dishwasher and avoid costly replacements. Remember, with the right tools and knowledge, you can tackle any dishwasher leak with confidence.